The Twitter Marketing Automation Hack That Runs On Autopilot
Here’s how to build a $9 automated Twitter Marketing sequence that shares specific curated content 24 hrs/day at times you choose. [+other…

Here’s how to build a $9 automated Twitter Marketing sequence that shares specific curated content 24 hrs/day at times you choose. [+other apps to help you grow your following - Ethically]
Today I’m gonna get into the nitty gritty detail of how to schedule tweets for curated content around the clock, 24 hours, completely on autopilot at the time slots you choose.
This automation is something I discovered and built myself through trial and error, although I accept others may have discovered it too. I continue to use it today to share articles related to my art, creativity, and marketing with my Twitter Audience. I also scaled this up recently to share the same or similar content to LinkedIn, Facebook, Google+ and other social profiles.
It costs me about $9 per month for a Buffer “Awesome Plan”. That’s my only outlay related to the sharing function. I spend another $12 per month for Manage Flitter. I use this to find and follow Twitter accounts that match my target audience. You may need a Feedly Pro account to make this happen. I signed up for Feedly when pro fee wasn’t required.
Occasionally I edit the schedule or delete content from the stream because it’s not relevant, but largely, the content I tee up is refined and specific to the audience I wish to attract.
By following what I’m gonna show you, you can do this too without very much input. Although I’d recommend reviewing your content feeds monthly.
So let’s jump into it!
Contents
Introduction
Part 1; The Formula
Part 2; The Process
Part 3; Using Narrow.io To Build Followers Automatically
Apps We’ll Be Using
Introduction
It was around January 2015 when I decided to focus on Twitter. I have other social media accounts but for some reason Twitter appealed to me more than the others.
There was one problem though…
I hadn’t got a clue how to use it.
Ok, so I was aware of a few fundamentals like; use hashtags so people can find your stuff, and you only get 140 characters (at the time) to make your point. But that was about the sum total of what I knew.
So I had no choice, I had to throw myself into it and figure things out.
From the beginning, I wanted to find out how to schedule tweets automatically and for as little outlay as possible. I knew there had to be an application available but I never found a single one that did all of what I wanted.
The first tool I tried (and I don’t know how I found it) was narrow.io. Jerad Maplethorpe used the word “Ethical” in his sales copy and that appealed to me.
So I signed up.
It’s a very simple tool to use to build your following on Twitter (which I’ll get into how to use a bit later), and all you need to do is use your Twitter account to sign up, set your keywords, and away it goes. All on autopilot.
Narrow ticks along in the background. If using Narrow is all you do right now you will most certainly see your Twitter following increase reasonably substantially every day. But don’t forget to directly engage with your followers too.
Other Apps I Was Using
I was already using Buffer which is a great tool, and I was experimenting with a couple other apps like Klout, but they weren’t giving me enough functionality.
There’s the feeds section in Buffer that I like (now redundant), but I couldn’t add those feed items to my stream automatically. Klout was the same, kind of.
I wanted a way to schedule tweets from quality targeted sources of my choosing, automatically around the clock, without much if any involvement from me.
I certainly didn’t want to have to schedule tweets manually on a daily basis, or even every couple of days. That’s a pain in the ass!
I wanted my Twitter feed on autopilot.
USING RSS FEED AGGREGATORS
Like I said, the feeds section of Buffer is great and I used it to gather feeds from my favorite blogs so I could share on my social media accounts. But it didn’t completely give me what I wanted.
I was already using Feedly to gather feeds from my favorite blogs together in one place, and I had been using the share functionality in Feedly to share on Twitter a couple times a day.
But that was still manual and too time consuming.
I was missing something and it was staring me in the face
IFTTT; The Missing Link
I had known about IFTTT HQ and I’d experimented with it, but for some reason it didn’t dawn on me that I could use it to solve my little technical Twitter sharing issue.
IFTTT is an app that allows you set up triggers to perform certain actions between different digital applications, such as online tools, home automation applications and iPhone.
I began using IFTTT to set up timed events on Twitter. In other words, I used recipes like this one below to send tweets at the day and time I wanted.
I figured I’d set up tweets to go out at Christmas, New Year, St. Patrick’s Day, Easter Sunday and other annual holidays
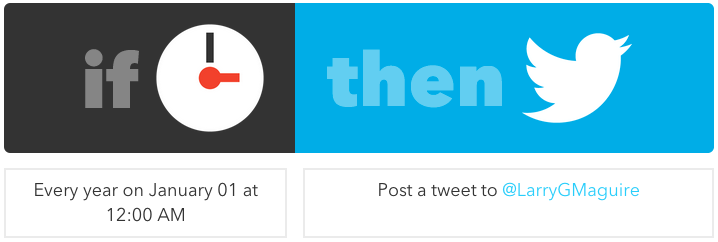
fig 1
So I continued to play around with the possibilities that IFTTT had presented, and then I thought I’d see if I could grab feeds from Feedly using IFTTT then send to Twitter….
Part #1 The Formula; How To Schedule Tweets Automatically
It turned out that I could, Et Viola!
But not quite. The recipes I set up weren’t right. They basically grabbed the feeds from Feedly all at once and dumped them like an avalanche on top of twitter, drowning out everything else on people’s Twitter timeline.
It created a scenario where there could be 20+ tweets published to Twitter in one hit.
That wouldn’t do at all.
Posting more than one tweet at a time is a no no. It’s basically spamming the heck out of your followers’ Twitter timeline.
But I was on the right track.
Then the penny dropped…. I realised I could send the Feedly feeds to Buffer using IFTTT, and once the schedule was set up in Buffer the way I wanted, the post feeds would be queued accordingly.
Result!
The only caveat to this is you’ve got to have a Buffer “Awesome Plan” in place so as to have the space to add the necessary number of tweets to your queue.
SO HERE’S THE FORMULA TO GET TWITTER ON AUTOPILOT;

fig 2
I realise that this formula simply stated is no good on it’s own, so let’s jump into Part #2 to see how to do it.
Part #2 The Entire Process Broken Down
Now I’m going to break the entire process down piece by piece so you can schedule your tweets automatically around the clock.
Set it up once and it’s done.
As per the image above, I’ll break the process down for each app in order of its place in the process, with each section leading into the next.
Note; You can substitute IFTTT with Zapier and you’ll probably achieve the same result. You will need a Feedly Pro Account to set up Feedly recipes in Zapier. With IFTTT you can do it with a free Feedly account.
For the benefit of those of you who’ve never used these apps before, I’m gonna go through things right from scratch, K!
FIRSTLY, GO SETUP FEEDLY
Go to feedly.com and register your account. I’d recommend you sign in with your Google account if you have one.
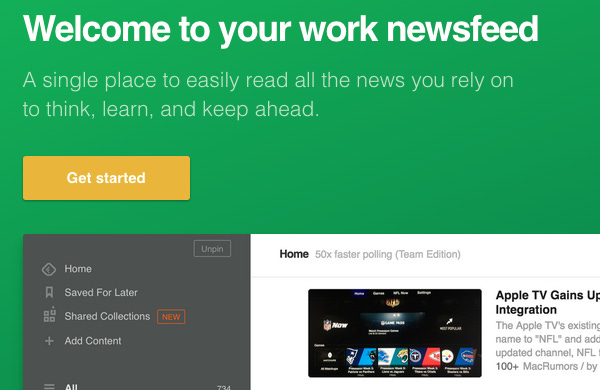
fig 3
After you’ve signed in you’ll be presented with the below screen where you’ll need to begin adding content. But before you begin adding content, you’ll need to decide what blogs best match your niche.
Once you decide on what blogs publish regular content in your niche, (and closely associated niches), and you think your audience will value it, add them here.

fig 4
Feedly will show you a sample of the content from the blog you’ve added. If you are happy that it’s correct, click the green +feedly button to add it.
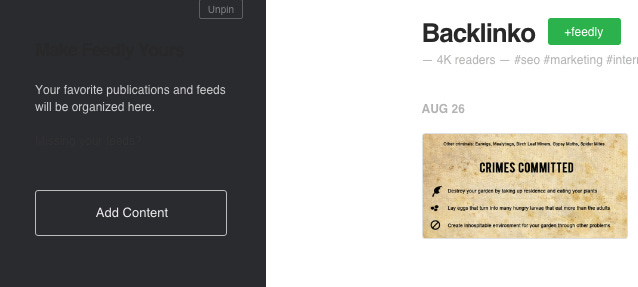
fig 5
As you add new content, you will see a sidebar pop out from the left where you will be asked to categorise the feed you just added. Make sure you select a category that matches the content you want to share.

FOR EXAMPLE;
If you are a café owner you might want to add categories such as…
Sandwich Ideas
Great Coffee
Speciality Teas
Relaxation Techniques
Feedly assigns the feed you’ve added, a category. If you are happy with this click “Add”. If not change it here.
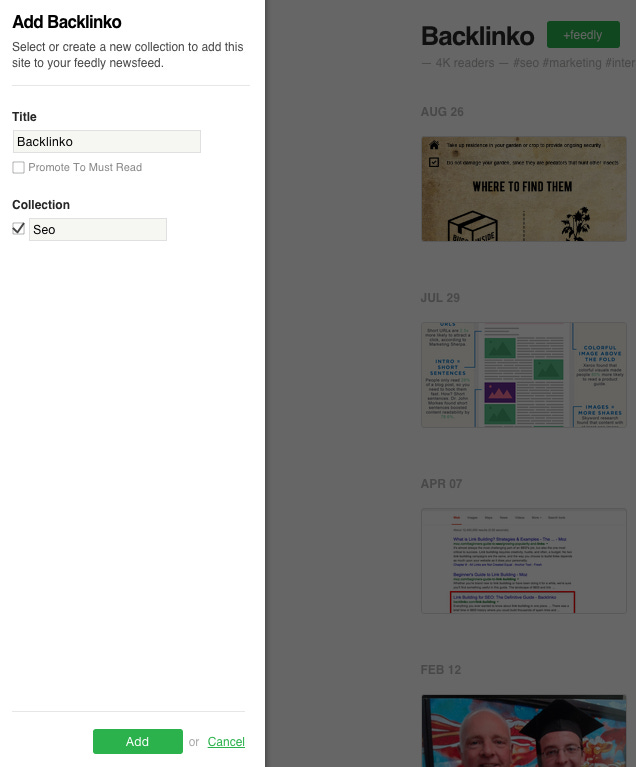
fig 6
Continue to add content until you build a substantial number of blogs in each category. The more relevant blogs you add, the better chance your feed in Buffer will remain full.
My categories have blog feeds that publish every day, or multiple times per day so my queue in Buffer stays full all the time.
Now you’re set up in Feedly.
A FEW THINGS TO CONSIDER WHEN ADDING BLOG FEEDS
Since first writing this article, a paid Feedly account is required to make this formula work for you.
If you add a blog feed that publishes content every day on a particular subject, your Buffer feed can end up heavily weighted on that subject. Try to keep a balance of content in your Feedly categories.
You could just create one category with all the feeds you want, but then you won’t be able to add category specific hashtags to your tweets. So be sure to add only specific content to each category in Feedly. I’ll show you that later in the IFTTT setup.
If you need to rearrange your feeds you can do so by clicking “organise” in the left sidebar.
Always check the feed content is good value and high quality, otherwise you could be sharing crappy content and it will do your image no good.
Be mindful of date specific content. If you queue up content that was released before Easter time from a specific blog, and that article goes to your queue as you’ve intended, it might not be published to your twitter timeline for a week. That’s not good. You want Easter relevant content to go out at Easter, not a week later. So always check your Buffer feed at holiday periods and put holiday specific content to the top of your queue.
NEXT, SETUP IFTTT RECIPES
Note: You’ll need to set up a Buffer “Awesome Plan” to make this work, so if you haven’t got a Buffer account go set one up. You can set one up here.
Go to ifttt.com and set up an account
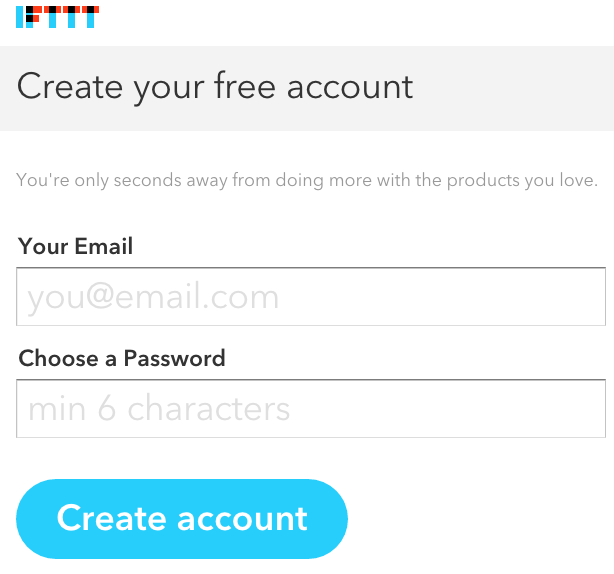
fig 7
You’ll need to add “channels” to IFTTT so you can link them to form what IFTTT call “recipes”. Recipes allow you to create the twitter automation we’re looking for. If you don’t add your channels at the start, don’t worry, you will be prompted to do so as you create your first recipe.
When you’re signed up, you’ll be brought to the following screen. Hit “Create a Recipe”
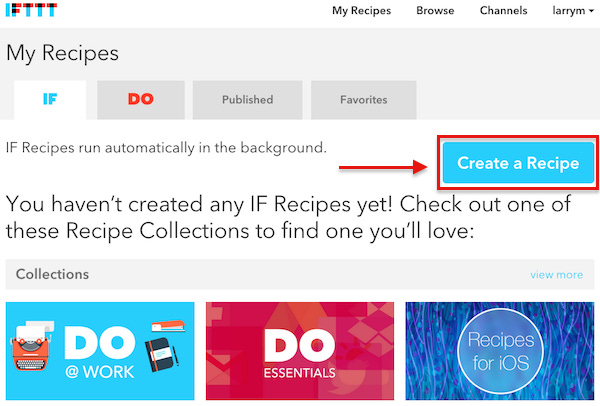
fig 8
In the next screen click the big blue “this”.
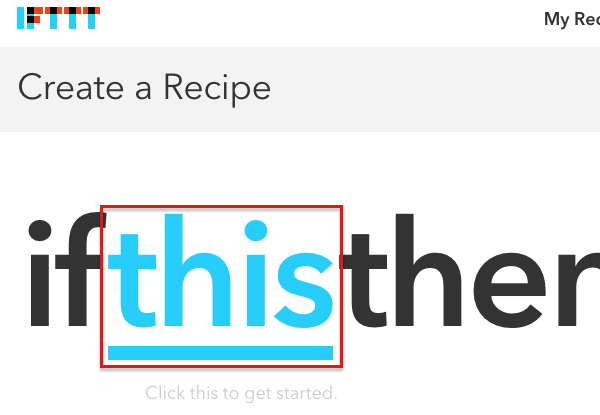
fig 9
Enter “Feedly” into the search bar, then click on the Feedly icon.
If you haven’t added Feedly as a channel you will be prompted to do so here.
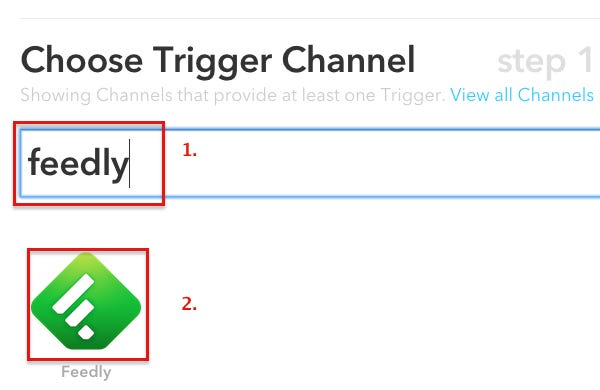
fig 10
After you successfully add your channel you need to choose a trigger for your recipe. Select “New article form category”.
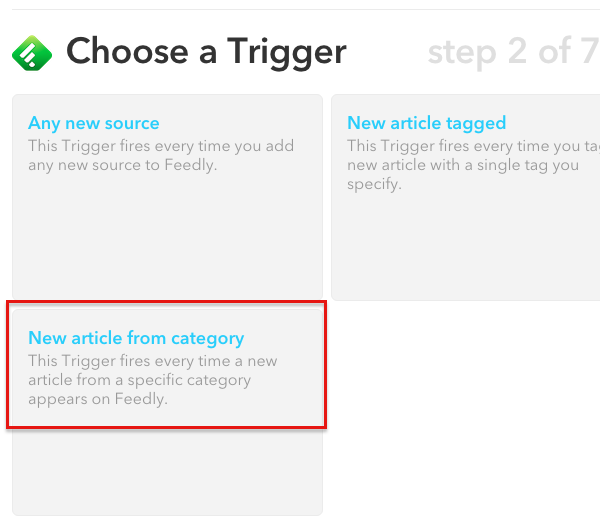
fig 11
Next, you will need to select one of the categories you created earlier in Feedly. Click “Create Trigger” to proceed.
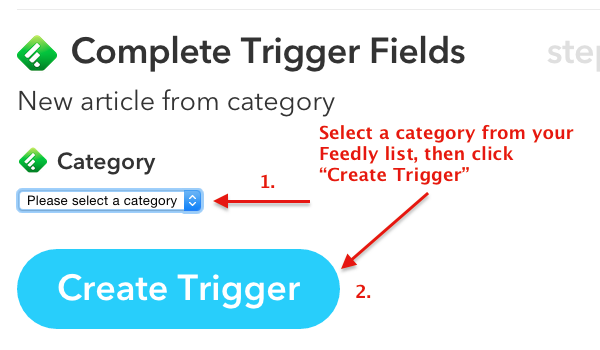
fig 12
Next, click the big blue “that”

fig 13
Then enter “Buffer” in the search bar. Click on the Buffer icon to proceed.
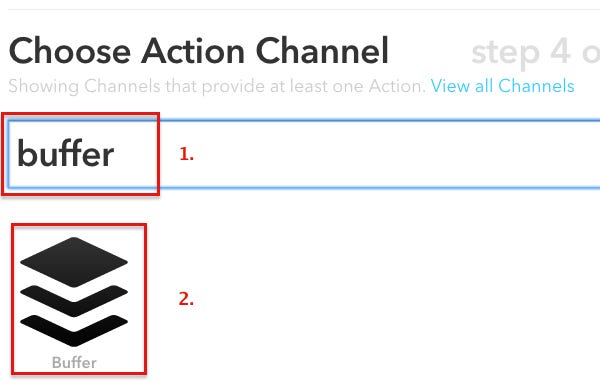
fig 14
Then, choose the action “Add to Buffer” for your recipe.
When you add your Buffer account to IFTTT, you will be asked to select which social media channel to queue your messages to. Select Twitter. If you have not added Twitter to Buffer yet, you need to go do that and come back to this step.
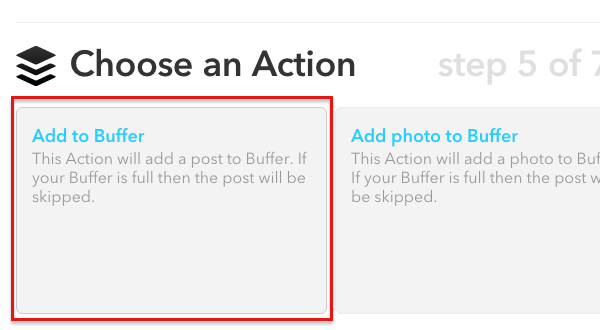
fig 15
THE NEXT STEP IS WHERE YOU WILL CUSTOMISE THE MESSAGE YOU SEND TO BUFFER (AND THEN TO TWITTER).
These are the short codes IFTTT will use to grab meta data from the feed you set up in Feedly.
Here’s the piece I spoke about earlier regarding hashtags. Manually type a hashtag that represents the content from the feed you set up in Feedly. Can you see now why category specific content is important?
When you click on this icon, it shows you ingredients you can add to your recipe. {{ArticleTitle}} and {{ArticleTags}} are set by default, but you can add to, or change these completely.
When you are happy, click “Create Action”
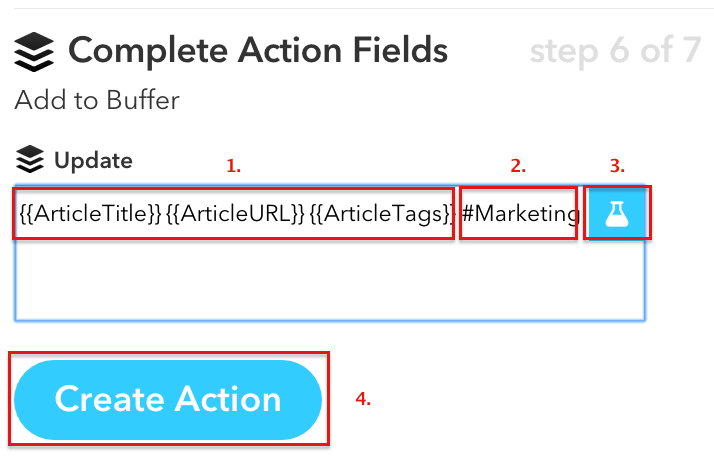
fig 16
Next up you will see a summary of your new recipe. I’d recommend that you uncheck the notifications box because you don’t want to be notified every time this runs.
Click “Create Recipe” to complete.
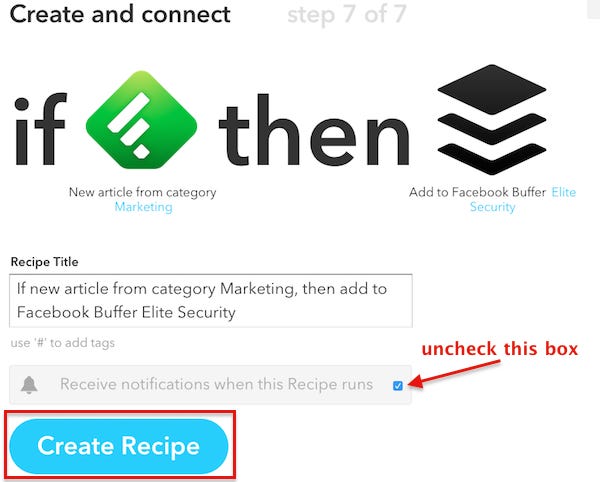
fig 17
Set Up Your Buffer Schedule
Now it’s time to set up your Buffer Schedule. I touched on this in Twitter For Business Tip #15 in the first post in the series but I get into it again here again for you.
I’ll take it you have a Buffer account already, if you don’t go and get an “Awesome Plan” so you can put this formula into action.
You could probably roll out this formula on the basic Buffer plan but I can’t see it working because there just isn’t enough scope within that basic plan to keep it running successfully.
Assuming you’ve already signed up, the first thing is to add your Twitter account. Click Add Account + in the top left hand corner of your dashboard and add Twitter on the next screen as per the image below.
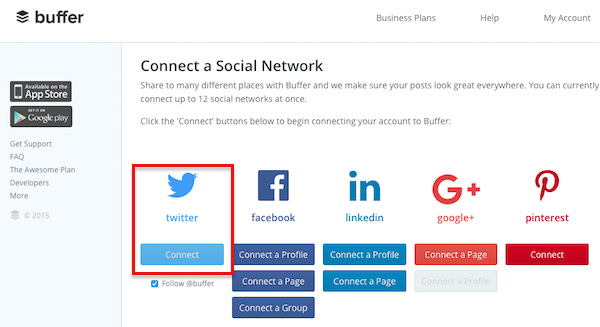
fig 18
Next, go to your Buffer dashboard, Select your Twitter in the left hand column, and then click “Schedule” in the menu bar.
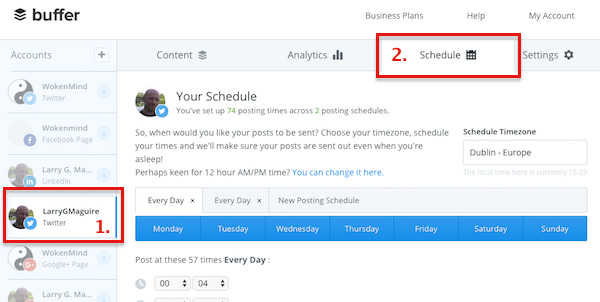
fig 19
You can set your schedule up any way you prefer. I take the same sharing schedule Monday to Sunday, same times every day. The more you study the activity of your audience, the better you can tailor the schedule.
Next, click “New Posting Schedule” and select Monday through to Sunday. As you can see from the image above, I post to Twitter 57 times in every 24 hour period.

HOW MUCH IS TOO MUCH?
Now, you might think that’s way too much, but it’s not. The pace at which your followers’ Twitter stream moves, means they will almost never catch more than one of your posts at a time.
They’ll catch more of them during those times of day when they relax, like lunchtime or the evening, but they’ll be well spread out so it won’t be considered spammy.
My tweets go out roughly every 30 mins with frequency increased to every 10 mins or so at peak time (12:00 to 14:00). This is why this formula works so well, you get to set the schedule as per your followers highest rate of activity.
I also send out my older blog articles every 3 hours using the Revive Old Post plugin.
To find out the best time to share your content, shoot on over to Optimal Sharing tool from Buffer, you can see when your audience is most active on a given network for your time zone.
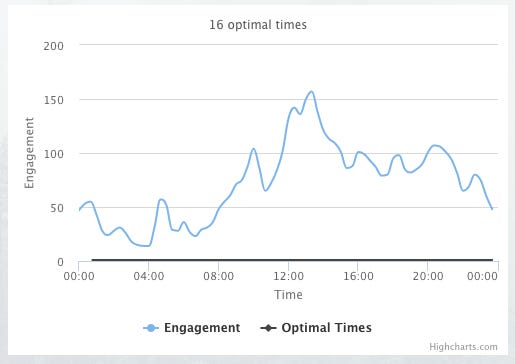
fig 20
That’s it.
You can sit back now and watch your followers rolling in…..well not quite.
As with any platform, you need to engage your audience, and that means getting involved in the conversation. All we’ve done here is tee up content that your followers want to read.
What this formula does is give you the time to engage in conversation, rather than spend hours scheduling tweets.
To start engaging with your followers, try Twitter Chats.
Engagement will increase and you will be able to see this with Twitter Analytics or Twitter Counter or other Twitter measurement tool.
REPLYING TO RETWEETS AND FAVORITES
Generally, it’s good practice to follow someone who follows you or retweets your stuff. Some people follow those who favorite a tweet but I don’t.
I don’t because I think there’s more weight to someone retweeting your shares so that gets my follows.
Here’s some good practice to follow when engaging with others on Twitter.
Follow those who follow you.
Follow those who retweet your stuff.
Say thanks when someone retweets your stuff.
Follow those whose tweets you retweet.
Unfollow those who don’t follow you back (unless they are an influencer).
Be a little choosey about those accounts you follow. Check that their stream is not full of spam.
Part #3 Using Narrow.io To Build Followers Automatically
Narrow is a nice little tool and one that is very easy to use. As I mentioned above, it was the first Twitter Automation tool that I signed up to using.
Within a couple of days, I began to see a marked increase in my following.
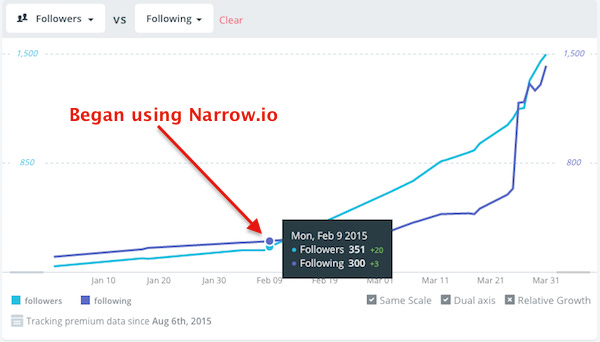
fig 21
I signed up for a narrow.io account on Saturday 7th Feb and by Monday 9th my numbers began to increase. You can see from the chart above my followers from that day were +20, without me doing anything.
Ok, that was small, but it was just the start.
Here’s how narrow.io works
Go visit narrow.io and signup for an account.
fig 22
When you are successfully logged in you’ll be then brought to your dashboard where you can begin to configure your account settings.
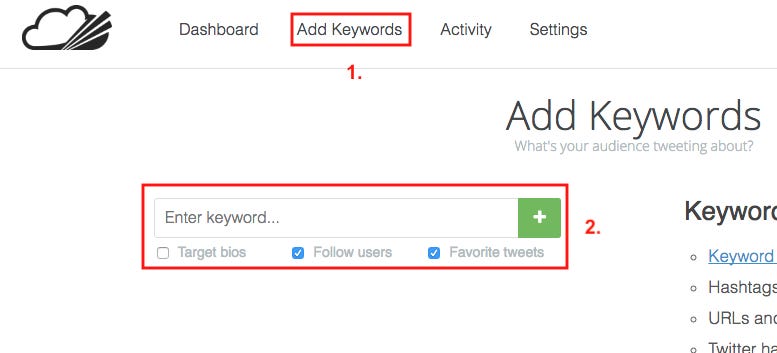
fig 23
In the top menu click “Add Keywords”
In the search box enter the keyword or hashtag you want to search for.
Select “Target Bios”, “Follow users” and/or “fav tweets” to set the action for the selected keyword.
Hit the green plus button to add the keyword to your dashboard.
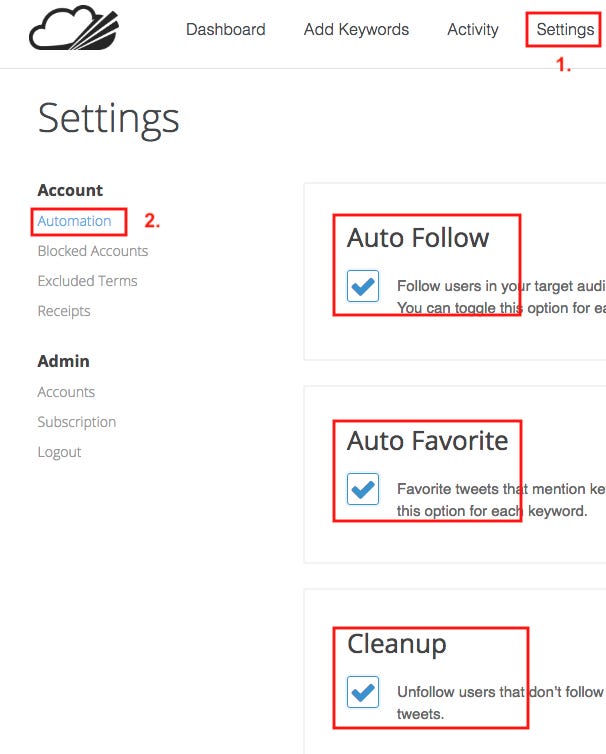
fig 24
Next, click “Settings”, then “Automation”
You’ll see three boxes as seen above in fig 24…Check the three boxes as desired. I’d suggest checking all three.
Narrow uses several methods for attracting followers. You can toggle these tools on the settings screen as shown in fig 24.
Auto-follow: Roughly 25–30 targeted accounts will be followed per day
Auto-favorite: Roughly 100 targeted tweets will be favorited per day
Cleanup: Narrow will unfollow accounts that don’t follow back and will unfavorite tweets after a few days.
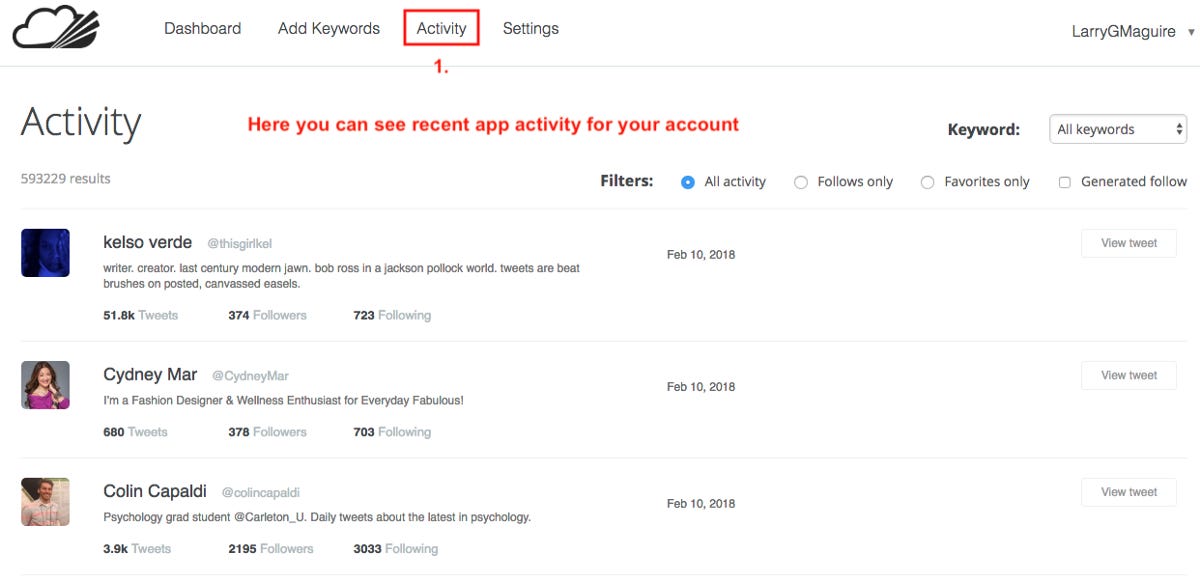
fig 25
After a couple hours running, you can view the app activity. Click on “Activity” to view and filter follows etc. There are other settings that you should check out, but we’ll leave it there for this tutorial.
It usually takes 2 days to start seeing results from Narrow. Once the followers start pouring in, you’ll be able to see which keywords are working and replace the ones that aren’t.
When Things Really Began To Kick Off
About 2 months later I discovered Manage Flitter. This application has probably had the single greatest impact on my follower numbers.
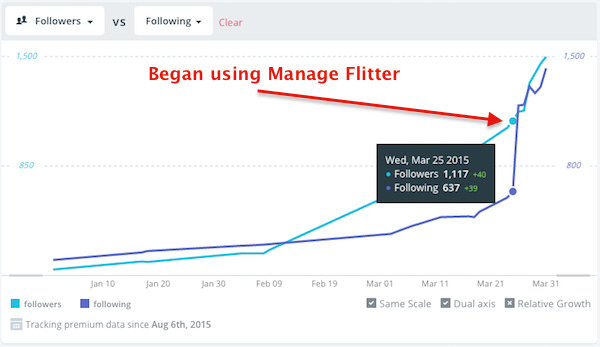
ManageFlitter allows you scale everything up, and with only about 10 minutes per day spent choosing who to follow. And in fact, you can even put that on auto by purchasing “Actions” and setting up “Follow Rules” and “Unfollow Rules”.
So that’s it.
That’s how I build engagement on Twitter and thus far Twitter is the largest channel to the overall social media traffic numbers to my site.
Just last week I had contact from a Twitter follower, Johnny Helleland who reached out and subsequently we did a conference call together for his upcoming online summit.
Stuff happens the deeper our reach in any given platform. I could of course do a better job, there’s always room for improvement and refinement. However, Twitter seems to be a platform that suits me so I’ll continue my efforts there.
Hope that’s been helpful.
This article was originally published on larrygmaguire.com 20th November 2017 and has been edited for republication here.

Support my work for only $1
Hook up with me here
Email | Facebook | Twitter | Podcasts | Instagram | Patreon


Thanks for reading The Marketing & Growth Hacking Publication
Follow us on Twitter. Join our Facebook Group. Subscribe to our YouTube Channel. Get our best stories in your inbox by following us below.

If you enjoyed this story, please recommend 👏 and share to help others find it!

